The feeling of a shrinking Toronto condo isn’t just in your head; the solution is to think like a magician, not just a decorator, by using architectural illusion to reclaim space.
- Instead of focusing on the floor, exploit your “vertical real estate” with smart wall-mounted solutions to regain valuable square footage.
- Choose high-impact, transformative furniture like a Murphy bed over a standard sofa bed to gain a fully functional room back.
Recommendation: Start by auditing your largest pieces of furniture; if they aren’t multi-functional or scaled correctly, they are the primary culprits stealing your space.
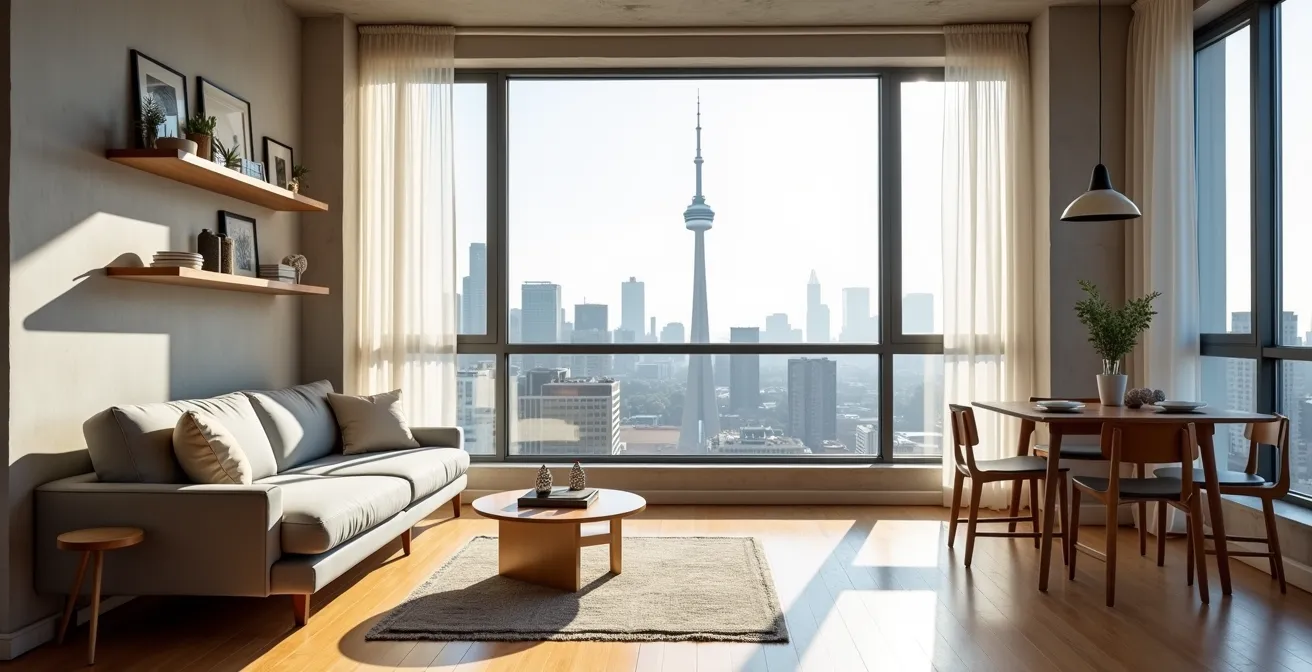
That sensation of the walls closing in on your downtown Toronto condo is a shared experience. As a designer specializing in compact urban living, I hear it constantly. You’ve followed the standard advice: you bought a smaller couch, you painted the walls white, and you’ve decluttered until you can’t part with another object. Yet, the space still feels… compromised. The challenge has grown as the average new condo in Toronto has shrunk to just 659 square feet, forcing owners to become ever more creative.
The common solutions only scratch the surface. They treat the symptom—the lack of space—but not the root cause, which is how we perceive it. The truth is, a 600-square-foot box has immense potential if you stop trying to fit a suburban mindset into an urban footprint. The real key isn’t just about what you put in the space; it’s about fundamentally altering the perception of its boundaries.
But what if the secret wasn’t just in using mirrors and light colours, but in mastering the art of architectural illusion? This guide moves beyond the platitudes. We’re going to explore how to manipulate sightlines, layer light like a professional, and reclaim dead zones by thinking vertically. This is about making your condo not just *look* bigger, but *live* bigger.
We will deconstruct this approach piece by piece, from leveraging your walls to choosing the right transformable furniture and mastering the psychology of light and colour. By the end, you’ll have a strategic blueprint to unlock the hidden volume in your home.
Summary: A Strategic Guide to Expanding Your Toronto Condo
- Why Your Walls Are Your Best Asset to Gain 20% Floor Space
- Sofa Bed or Murphy Bed: Which Solution for Hosting Guests Without Sacrificing the Salon?
- The Decorating Mistake That Makes Your Condo Look Twice as Small
- Warm or Cool Light: How to Visually Enlarge a Room with No Direct Window?
- Rugs and Curtains: How to Use Them to Define Zones in an Open Space?
- Murphy Bed or Convertible Sofa: Which Investment for a 400 sq. ft. Studio?
- How to Create a Layered Lighting Plan for a Multifunctional Living Room?
- How to Use Color Psychology to Brighten a Dark Toronto Condo?
Why Your Walls Are Your Best Asset to Gain 20% Floor Space
In a typical Toronto condo, the floor plan is finite. It’s the most expensive real estate you own, yet most people only use it in one dimension. The single most effective strategy to reclaim this space is to shift your thinking from horizontal to vertical. Your walls aren’t just for hanging art; they are what I call “vertical real estate,” an untapped resource that can genuinely increase your usable surface area. By moving storage, surfaces, and even furniture off the floor, you free up critical pathways and create an uninterrupted sightline, which is the number one trick to making a space feel larger.
This isn’t just about adding a few floating shelves. It’s a comprehensive strategy. Think wall-mounted desks that fold away, high-perimeter rails that display art without cluttering surfaces, and tension rod systems that add storage between concrete pillars without drilling. Every item that can be lifted from the floor contributes to a feeling of lightness and openness. The goal is to have the floor as clear as possible, creating a clean visual sweep for the eye.
Case Study: Transforming a 300 sq. ft. Bachelor Pad
A designer in Toronto took on an ultra-compact 300 sq. ft. condo and turned a cramped multi-zone into a calm, modern space. A key part of the transformation was replacing all standard swing doors with sleek sliding doors built into custom millwork. This simple change instantly freed up the 9-12 square feet of floor space that each door’s swing had previously occupied, demonstrating how rethinking vertical elements can have a dramatic impact on the floor plan.
Implementing this requires a plan. Start by identifying the “floor hogs” in your space—bookcases, media units, and side tables. Then, explore vertical or wall-mounted alternatives for each. This strategic shift can genuinely make it feel like you’ve gained a whole new room.
Your Action Plan: Reclaiming Your Floor Space
- Entryway Audit: Identify floor clutter by the door. Install a thin, wall-mounted console or shelf for keys, mail, and daily essentials to keep the entrance clear.
- Storage Inventory: List all items currently in floor-based storage (e.g., books, decor). Plan to move them to high shelves or wall-mounted cabinets.
- Drill-Free Solutions: For concrete walls common in Toronto condos, investigate tension rod systems. Use them between walls or in alcoves for hanging clothes or creating partitions without permanent fixtures.
- Surface Analysis: Do you have a desk or dining table that’s rarely used? Replace it with a wall-mounted drop-leaf table that folds completely flat.
- Perimeter Potential: Consider installing a high art rail around the perimeter of the main living area. This allows you to hang and change multiple pieces of art without drilling numerous holes, keeping walls dynamic and surfaces clear.
Sofa Bed or Murphy Bed: Which Solution for Hosting Guests Without Sacrificing the Living Room?
The guest room is the first casualty of small-space living in Toronto. For most condo owners, the living room must do double duty. The default choice is often a sofa bed, but this decision frequently leads to regret. While seemingly practical, sofa beds involve significant compromises: they occupy a large, permanent footprint, often provide a subpar sleeping experience on a thin mattress, and the daily conversion can be cumbersome.
The alternative, a Murphy bed, represents a paradigm shift in space utilization. It’s not just a piece of furniture; it’s a transformative system. When closed, it can disappear into a sleek wall of custom cabinetry, which might also house a desk, shelving, or a media unit. When open, it provides a guest with a real mattress and the comfort of a dedicated bed. The key benefit is that for 95% of the time when you don’t have guests, you get 100% of your living room floor space back. This is particularly crucial in a 600 sq. ft. layout where every inch counts.
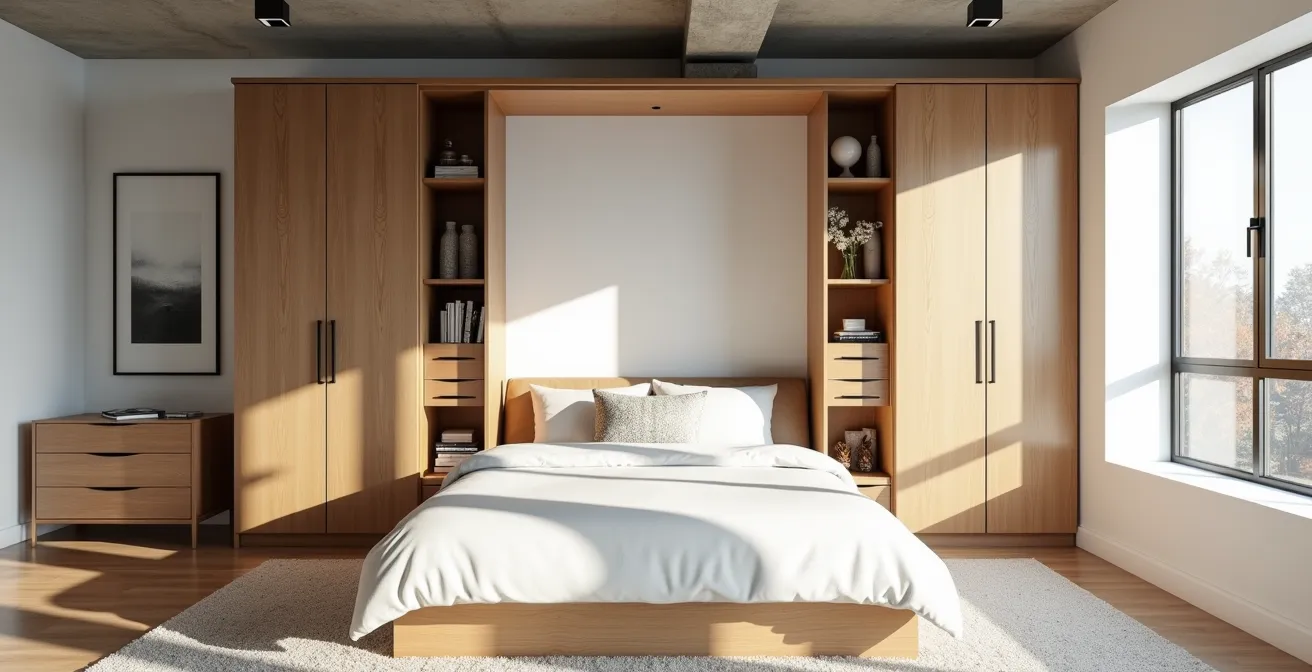
While the initial investment for a Murphy bed is higher, the return is a truly multifunctional room, not a living room that’s permanently compromised by a bulky, uncomfortable sofa. It also addresses a key issue for Toronto condos: condo board approval. While modifications may be needed, many modern systems are designed for condo constraints.
This table breaks down the crucial differences for a Toronto condo owner. As a designer, I consistently find the long-term spatial gain from a Murphy bed far outweighs the convenience of a sofa bed.
The following comparative analysis, based on data for the Toronto market, clearly outlines the trade-offs between these two popular solutions.
| Feature | Murphy Bed | Sofa Bed |
|---|---|---|
| Average Cost in Toronto | $3,000-$6,000 installed | $800-$2,500 |
| Space Required | Wall space + 6-8 ft clearance | Full sofa footprint permanently |
| Installation Requirements | Professional installation, wall mounting to studs | No installation needed |
| Mattress Quality | Regular 10-12″ mattress | Thin folding mattress (4-6″) |
| Daily Conversion Time | Under 60 seconds | 2-3 minutes with cushion removal |
| Condo Board Approval | Often required for wall modifications | |
| Impact on Resale Value | Can increase appeal to investors | Neutral impact |
The Decorating Mistake That Makes Your Condo Look Twice as Small
The most common and most damaging decorating mistake I see in Toronto condos is not colour or clutter—it’s improper scale. Many homeowners, in an attempt to make a small space functional, fill it with furniture that is simply too large for the room’s proportions. A giant sectional sofa, a dining table for six, or a king-sized bed can instantly devour a 600 sq. ft. layout, leaving you with awkward circulation paths and a feeling of being cramped. One client aptly described her living room as “a hallway with a couch” after trying to fit a standard-sized sofa.
The solution isn’t necessarily “tiny” furniture, but “condo-sized” furniture. These are pieces designed with narrower profiles, lower backs, and exposed legs that create a sense of lightness and allow you to see the floor underneath—a crucial trick for creating an illusion of space. For example, two condo-sized sofas or a sofa with two armchairs often create a more spacious and flexible seating area than one massive sectional. It’s about respecting the room’s architecture, not fighting it.
Another critical scaling error is blocking natural light. Pushing furniture against floor-to-ceiling windows, a prized feature in many Toronto condos, chokes the room’s biggest asset. Instead, pull furniture a few inches away from the glass to create breathing room and frame the view. Always measure your space before you buy anything, and create a to-scale floor plan to ensure pieces fit comfortably with adequate clearance. A well-proportioned space with fewer, better pieces will always feel larger and more luxurious than a room stuffed to the gills.
The “Two Criteria” Filter for Small Space Furniture
In a 660 sq. ft. Toronto condo housing a family of three, every piece of furniture was chosen by filtering it through two questions. First, can it serve more than one purpose? (e.g., a nightstand that can be used as an extra stool). Second, can it integrate a storage solution? (e.g., a platform bed with open sides for storing flat items). This disciplined approach ensures every item justifies its footprint.
Warm or Cool Light: How to Visually Enlarge a Room with No Direct Window?
The dreaded windowless den is a classic Toronto condo feature. Without a source of natural light, these spaces can quickly feel like claustrophobic caves. The instinct is often to blast them with the brightest, coolest light possible, but this can create a sterile, clinical feeling. The ingenious solution lies in creating the *illusion* of natural light by manipulating both light temperature and reflection. The goal is to “light-wash” the walls to make them visually recede.
First, embrace the power of reflection. A large, well-placed mirror is the most effective tool in your arsenal. The magic happens when a mirror is placed on the wall opposite an opening or a light source from an adjacent room. This not only bounces light but also creates the illusion of depth, almost like another window. Since mirrors reflect almost 100% of the light that hits them, their impact is dramatic. Use large, frameless mirrors to maximize this effect without adding visual clutter.

Second, the quality of your artificial light is paramount. Forget standard bulbs. Invest in tunable white LED bulbs. These allow you to adjust the light temperature from warm (around 3000K) to cool (up to 5000K). During the day, you can set the light to a cooler, bluer tone to mimic natural daylight. In the evening, you can shift to a warmer, cozier glow. Also, pay attention to the Colour Rendering Index (CRI) of your bulbs. A high CRI (90+) will render colours more accurately, making the space feel more natural and vibrant, preventing the washed-out look common in artificially lit rooms.
Finally, use low-profile fixtures. In a room with no windows, you want the light source to be discreet. Consider LED strip lighting hidden in a cove or under a floating shelf, or sleek, flat ceiling fixtures. The light should feel like it’s emanating from the room itself, not from a bulky, obvious source. This combination of reflection and high-quality, adaptable light can truly transform a dark den into a usable, inviting space.
Rugs and Curtains: How to Use Them to Define Zones in an Open Space?
In an open-concept 600 sq. ft. condo, the lack of walls can make the space feel like one big, undefined room where functions bleed into one another. The living area merges with the dining space, which spills into the entryway. The secret to creating order and a sense of spaciousness within this openness is zonal demarcation—using visual cues, not physical barriers, to create distinct “rooms within a room.” Rugs and curtains are your most powerful and flexible tools for this.
An area rug is the simplest way to anchor a zone. Placing a rug under your seating area (living room) or dining table instantly creates a visual boundary. It signals to the brain, “this is a separate space with a distinct purpose.” The trick is to choose the right size and style. For a seating area, the rug should be large enough that at least the front legs of all furniture pieces are on it. This unifies the grouping and makes it feel cohesive. To heighten the sense of separation, you can use contrasting rugs for different zones.
Define separate areas like the living room and dining room with strategically placed area rugs. Choose contrasting colours or patterns for each area rug to visually differentiate the spaces in your small condo design.
– Surplus Furniture Design Team, Small Condo Design Guide Ontario
Curtains, often overlooked, perform a similar function but on a vertical plane. Hanging floor-to-ceiling curtains, even if the window isn’t that tall, is a classic designer trick. This long vertical line draws the eye upward, creating an illusion of height and grandeur. Use sheer or light-coloured curtains to maintain an airy feel while still defining the window area as a distinct visual feature. In some layouts, a sheer curtain on a ceiling track can also be used as a soft, translucent divider to subtly screen a workspace or sleeping nook without blocking light.
By using a large rug to define the living zone and floor-to-ceiling curtains to add verticality, you create a sophisticated, layered space that feels both open and organized. These elements guide the eye and structure the room without erecting a single wall, preserving the integrity of the open plan while eliminating the chaos.
Murphy Bed or Convertible Sofa: Which Investment for a 400 sq. ft. Studio?
When the entire home is a single room, as in a 400 sq. ft. Toronto studio, the choice between a Murphy bed and a convertible sofa moves beyond convenience and becomes a critical investment decision. In this context, the primary goal is to transform a sleeping space into a living space, and the durability of that transformation is paramount. A convertible sofa is used daily, both for sitting and sleeping, leading to rapid wear on its mechanism and cushions. It remains a compromise—never a great sofa, and never a great bed.
A Murphy bed, by contrast, is an investment in durability and quality of life. The mechanism is engineered for thousands of cycles of use. High-quality systems are rigorously tested; for instance, some leading mechanisms are proven to withstand 10,000 opening and closing cycles with a mattress, which equates to over 27 years of daily use. This is a level of longevity a sofa bed mechanism could never achieve. This durability means you are investing in a long-term solution, not a temporary fix that will need replacing in a few years.
Furthermore, the investment pays dividends in sleep quality and daytime function. A Murphy bed houses a standard mattress of your choosing (up to 12 inches thick), providing the same restorative sleep as a conventional bed. During the day, it doesn’t just fold away; it transforms the room. The space isn’t just “not a bedroom” anymore—it becomes a fully functional office, living room, or creative space, unencumbered by a piece of furniture that is trying to be two things at once.
For a studio dweller, this isn’t just about saving space; it’s about preserving sanity. The psychological benefit of putting your bed “away” and creating a clear distinction between your rest and active zones is immense. While the upfront cost is higher, the Murphy bed’s durability, superior comfort, and complete spatial transformation make it the far wiser long-term investment for maximizing a studio footprint.
How to Create a Layered Lighting Plan for a Multifunctional Living Room?
In a condo where the living room is also the dining room, home office, and entertainment hub, generic overhead lighting is a recipe for a flat, uninviting atmosphere. A successful multifunctional space demands a layered lighting plan, a technique designers use to create mood, define zones, and support various activities. It involves combining three distinct types of lighting: Ambient, Task, and Accent.
Ambient Lighting is the foundation. This is the general, overall illumination that allows you to navigate the space safely. In Toronto condos, this is often a single, builder-grade ceiling fixture. The first step is to upgrade this. Consider modern track lighting with adjustable heads that can be aimed where needed, or a sleek flush-mount fixture that provides broad, diffuse light. The key is to have even, glare-free illumination as your base layer.
Task Lighting is the workhorse of your plan. This is targeted light for specific activities. A stylish, adjustable floor lamp next to your favourite reading chair, an articulated desk lamp for your work-from-home area, or a series of pendant lights hung low over the dining table are all examples of task lighting. These lights not only provide focused illumination but also help in zonal demarcation. A pendant light over a dining table, for instance, visually carves out that area as a distinct “dining room,” even in an open-concept layout.
Accent Lighting is the final, magical layer. This is the jewellery of the room. It’s used to highlight architectural features, art, or decor. Think of an uplight placed behind a plant to create dramatic shadows on a concrete column, or LED strip lights installed under floating shelves to create a warm glow. Accent lighting adds depth, dimension, and personality. It’s what takes a room from simply “lit” to beautifully designed. By combining and controlling these three layers—ideally with dimmers or smart plugs to create “scenes” like ‘Work,’ ‘Dinner,’ or ‘Movie Night’—you can make a single room adapt perfectly to its many functions.
Key Takeaways
- Embrace Verticality: Your walls offer more usable space than you think. Moving storage and surfaces off the floor is the fastest way to make a room feel larger.
- Invest in Transformation: For dual-use spaces, high-quality transformable furniture like a Murphy bed provides a far greater return in space and comfort than a conventional sofa bed.
- Master Layered Light: A successful lighting plan combines ambient (general), task (focused), and accent (dramatic) lighting to create mood and define zones.
How to Use Color Psychology to Brighten a Dark Toronto Condo?
Painting a dark, north-facing condo “white” seems like the obvious solution, but often it can backfire, resulting in a room that feels cold, sterile, and gray. This is because light has colour, and the cool, indirect light typical of many Toronto condos will make a pure, cool white look dull and shadowy. The secret is not just to use light colours, but to use the *right* light colours, leveraging colour psychology to create warmth and the illusion of sunlight.
Instead of a stark, blue-toned white, opt for warm off-whites. These are whites with a subtle yellow, beige, or pink undertone. Colours like Benjamin Moore’s “Chantilly Lace” or “Swiss Coffee” have just enough warmth to counteract the cool northern light, making the walls glow softly as if they were touched by the sun. This technique of “light-washing” the walls in a warm neutral is far more effective at creating a bright, inviting space than using a pure, cold white.
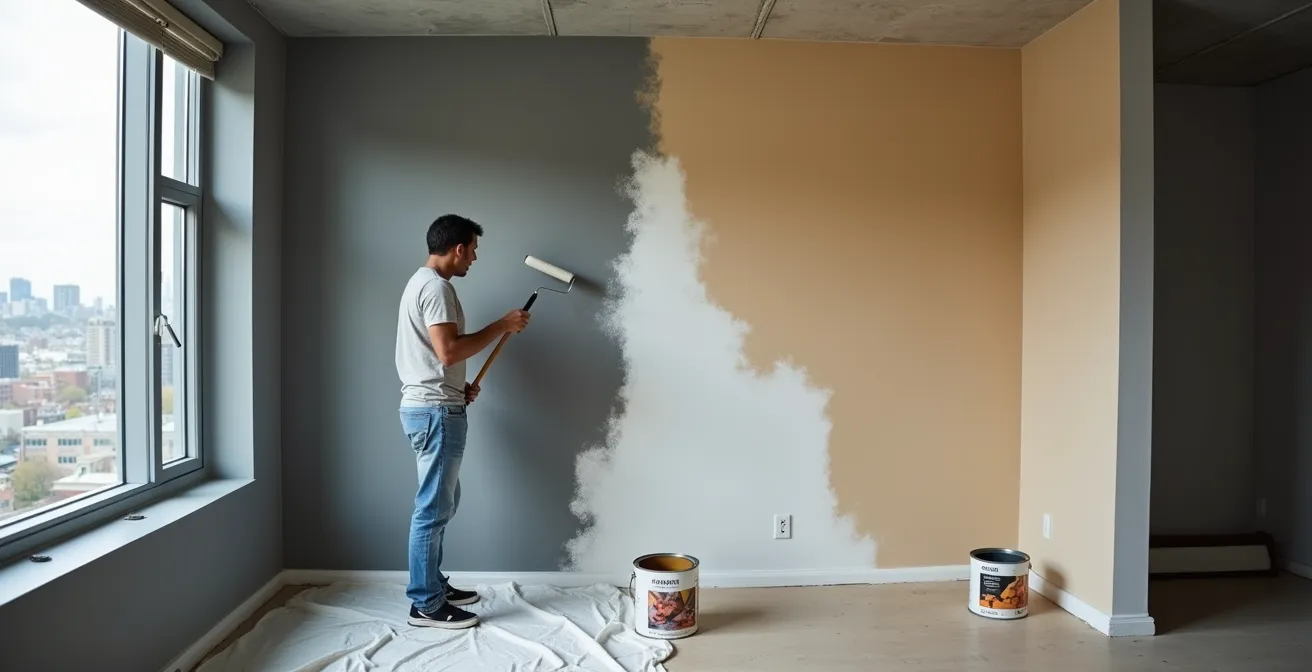
While the majority of your walls should be in these light, warm tones to maximize light reflection, a room with no contrast can feel flat. Introduce depth with a single accent wall. But instead of a bright, jarring colour, choose a deep, saturated jewel tone like an emerald green or a deep navy. This creates a point of interest and, paradoxically, can make the space feel larger. The dark wall will visually recede, adding depth, while the surrounding light walls will feel even brighter by comparison.
Finally, consider the ceiling. A common mistake is to paint the ceiling the same colour as the walls or a standard “ceiling white.” To create an illusion of height, especially in condos with lower ceilings, paint the ceiling a shade that is 10% lighter than your wall colour. This subtle shift is barely perceptible, but it draws the eye upward and makes the entire room feel more airy and expansive. It’s these nuanced applications of colour, not just a blanket of white, that truly brighten and enlarge a darker space.
By systematically applying these principles of architectural illusion, from leveraging your vertical real estate to layering light and color, you can fundamentally transform your 600 sq. ft. condo. Evaluate your space today to identify where you can replace static, single-use items with dynamic, multi-functional solutions and turn spatial constraints into design opportunities.