In summary:
- Treat your BBQ as a logistical mission: plan your entry, on-island movement, and exit strategy from the start.
- Master the “wagon strategy” by loading heavy items low and central to conquer the steep ferry ramp.
- Bypass the main ferry terminal bottleneck on peak weekends by using a water taxi, especially for the return trip.
- Choose your beach (Centre, Hanlan’s, Ward’s) based on your group’s tolerance for crowds, noise, and amenities.
- Constantly monitor the time and start heading back to the docks at least 30-45 minutes before you want to be on a ferry.
The vision is perfect: a sun-drenched Saturday on the Toronto Islands, the sizzle of burgers on a public grill, friends and family laughing on a picnic blanket. The reality, however, can quickly descend into a logistical nightmare. Many guides will tell you to “buy tickets online” or “check the ferry schedule,” but this barely scratches the surface of the real challenges. A successful island BBQ is not won with good intentions; it is won with good planning.
The anxiety is real and justified. It stems from navigating choke points packed with thousands of people, managing gear across land and water, and the ever-present pressure of that final ferry home. Missing it means a costly water taxi ride or, worse, being stranded. This guide treats your day of leisure with the seriousness of a planned event, focusing on the underlying systems that govern a trip to the islands. We will not just tell you what to do; we will explain why it’s necessary.
Forget generic advice. This is your operational playbook. We will move beyond simple tips to deliver a strategic framework for your trip. You’ll learn to identify and neutralize logistical threats, from packing your wagon for maximum stability to making a data-driven choice between the ferry and a water taxi. By the end, you won’t just be hoping for a good day; you’ll have engineered one.
This article breaks down the entire operation into a series of mission-critical decisions. Follow this guide to navigate the crowds, the terrain, and the clock, ensuring your group gets there, enjoys the day, and gets back without a single logistical regret.
Summary: Your Toronto Islands BBQ Operational Plan
- Why Open Alcohol Containers Result in Heavily Patrolled Fines on the Islands?
- How to Pack a Wagon for the Ferry to Avoid Multiple Trips?
- Hanlan’s Point vs Centre Island: Which Beach Fits Your Group’s Comfort Level?
- The Spring Mistake of Planning an Island Trip During High Water Levels
- When to Head to the Docks to Beat the 30-Minute Ferry Lineup?
- Why the Jack Layton Ferry Terminal Is a Bottleneck on Summer Weekends?
- How to Rent a Bike on the Waterfront Trail Without Leaving a Massive Deposit?
- Water Taxi vs Ferry: Is Saving 20 Minutes Worth the Extra $10 Cost?
Why Open Alcohol Containers Result in Heavily Patrolled Fines on the Islands?
The first rule of a stress-free island BBQ is understanding the legal landscape. The Toronto Islands are a city park, and like all city parks, consuming alcohol in non-licensed areas is strictly prohibited. This isn’t a loosely enforced guideline; it’s a rule that is actively patrolled, especially on busy summer weekends. The sight of officers on bikes is common, and their focus is often on groups with visible open alcohol. Ignoring this can be a costly mistake.
The penalty for having an open container of alcohol is not a mere slap on the wrist. A ticket for this infraction can cost you dearly, with fines starting at $300 for an open container in a park. This is a significant, day-ruining expense that is easily avoidable. The city’s rationale is based on public safety, family-friendliness, and managing behaviour in crowded public spaces. For your group, the takeaway is simple: the risk is not worth the reward.
So, what’s the planner’s alternative? If having a drink is part of the plan, you must incorporate licensed venues into your itinerary. The islands offer a few options where you can legally purchase and consume alcohol on a patio. Consider these alternatives:
- Toronto Island BBQ & Beer Co.: Conveniently located near the Centre Island dock, this large venue with a 500+ seat patio is the most popular choice. It operates seasonally from May to September.
- The Rectory Café: Situated on Ward’s Island, this offers a more intimate and quiet setting. It’s crucial to check their seasonal hours in advance.
Be aware that these venues are extremely popular and can fill up fast on a Saturday. Furthermore, expect to pay a premium compared to mainland prices due to the logistics of island supply. The smart strategy is to treat these as a planned stop, not a spontaneous one.
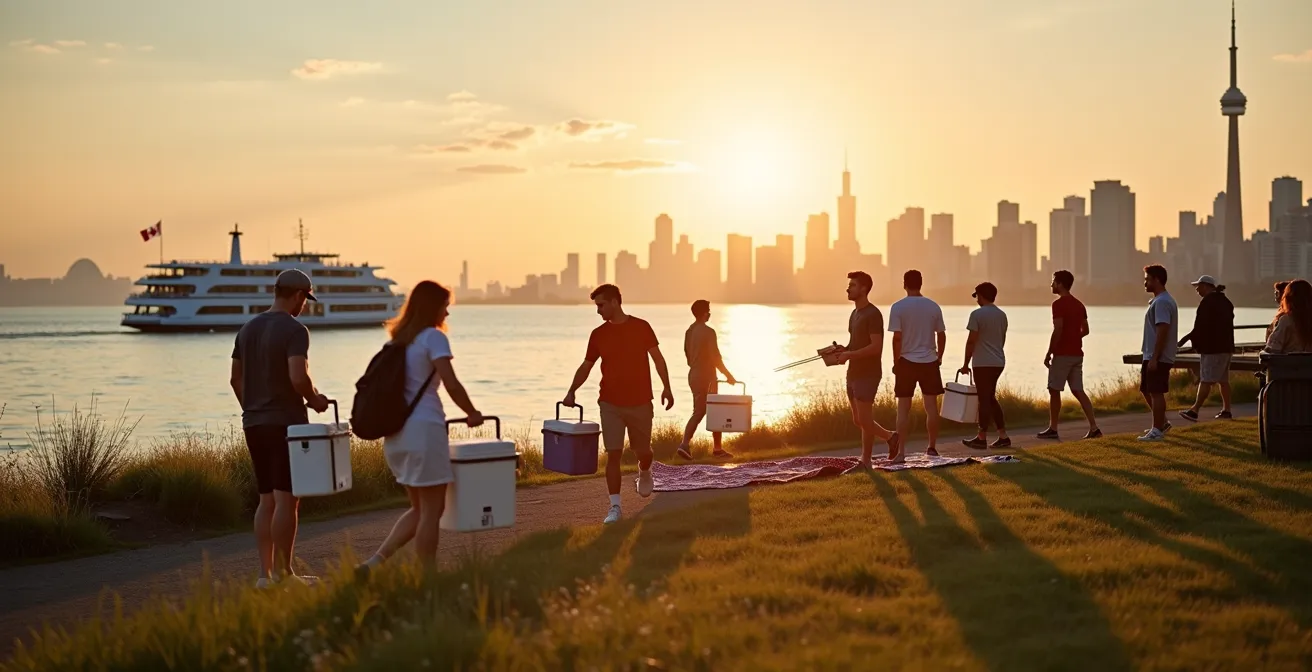
How to Pack a Wagon for the Ferry to Avoid Multiple Trips?
Your wagon is not just a cart; it’s your mobile base of operations. Packing it correctly is the single most important physical task for a successful island trip. The journey involves navigating crowds, uneven paths, and most critically, the steep and often wet ferry ramp. A poorly packed, top-heavy wagon is an accident waiting to happen, causing delays, spills, and immense frustration. The “wagon strategy” is about creating a low-gravity, stable unit that moves with you, not against you.
The fundamental principle is physics: place the heaviest and densest items at the very bottom, directly over the axles. This creates a stable base and lowers the center of gravity, making the wagon far less likely to tip on an incline. This is your first and most critical step. Your heaviest items will almost always be your coolers packed with ice, drinks, and raw food.

Once your heavy base is established, you can layer the remaining items. Medium-weight items like food containers, bags of charcoal, and portable speakers go in the middle. The lightest and most crushable items—blankets, towels, bags of chips, and paper goods—go on the very top. Before you even leave for the terminal, secure the entire load with bungee cords or a cargo net. A quick test pull on flat ground will reveal any balance issues before they become a public spectacle on the ferry ramp. When navigating the ramp itself, have one person pull from the front while another steadies the wagon from behind to prevent it from rolling back.
Your Wagon Loading Action Plan
- Foundation First: Place heaviest items (coolers with ice) at the bottom center, directly over the axle to create a stable base.
- Middle Layer: Stack medium-weight items (food containers, charcoal) in the middle, distributing weight evenly.
- Top Off Lightly: Put lightweight and crushable items (blankets, towels, chips) on top to prevent shifting and damage.
- Secure the Load: Use bungee cords or a cargo net to strap everything down tightly before approaching the ferry ramp.
- Pre-Departure Check: Test the wagon’s balance by pulling it on flat ground before you head to the terminal to identify any instability.
–
Hanlan’s Point vs Centre Island: Which Beach Fits Your Group’s Comfort Level?
Choosing your destination on the islands is a strategic decision, not just a matter of preference. Each of the main areas—Centre Island, Hanlan’s Point, and Ward’s Island—offers a vastly different experience. As the planner, your job is to perform “comfort triage”: matching the location’s characteristics to your group’s specific needs, size, and tolerance for crowds and noise. The biggest mistake is assuming all island spots are created equal.
Centre Island is the default for most visitors, especially families. Its proximity to the Centreville Amusement Park means it has the highest concentration of amenities, washrooms, and, consequently, the highest crowd density and noise levels. It boasts the most BBQ pits, but they are in high demand and are often claimed early in the morning. If your group includes young children or requires easy access to facilities, this is your safest, albeit most crowded, bet.
Hanlan’s Point offers a different trade-off. It’s generally less crowded, and the BBQ pits are easier to secure. However, it has two significant factors to consider. First, a portion of its beach is famously clothing-optional, which may not align with every group’s comfort level. Second is its proximity to Billy Bishop Airport. The regular take-off and landing of planes, about every 10-15 minutes during peak hours, creates a consistent level of noise that can interrupt conversation. Some find it adds to the urban character, while others find it disruptive.
Ward’s Island is the quiet, residential side. It has the lowest crowd density and a peaceful, community feel. However, its public facilities, including washrooms and especially BBQ pits, are very limited. This area is best suited for small, self-sufficient groups who prioritize tranquility over amenities.
This comparative table breaks down the key decision factors. As confirmed by a recent analysis of island amenities, the differences are stark and should guide your planning.
| Criteria | Centre Island | Hanlan’s Point | Ward’s Island |
|---|---|---|---|
| Family Friendliness | High (near Centreville) | Low (clothing-optional area) | Medium (residential feel) |
| BBQ Pit Availability | Most numerous | Limited but less crowded | Very limited |
| Distance from Ferry | 5-10 min walk | 10-15 min walk | 5 min walk |
| Noise Level | High (families, attractions) | Medium (airport nearby) | Low (quiet residential) |
| Crowd Density | Very High on weekends | Medium | Low |
| Washroom Access | Multiple facilities | Limited facilities | Very limited |
The Spring Mistake of Planning an Island Trip During High Water Levels
An often-overlooked but critical planning variable is the time of year, specifically concerning Lake Ontario’s water levels. Planning an island BBQ in late spring (May and June) carries a significant risk: flooding. Historically high water levels can lead to partial or even full island closures, turning your well-laid plans into a last-minute scramble for an alternative. This isn’t a rare occurrence; it’s a recurring environmental challenge for Toronto.
The impact of flooding can be severe. It doesn’t just mean a few puddles; it can mean entire sections of the park, including prime BBQ areas and beaches, are completely submerged and inaccessible. The city is forced to close off large areas for public safety. The floods of 2017 and 2019 serve as stark reminders. During the 2017 floods, which saw record water levels, Centre Island was shut down for almost three months. In 2019, partial closures lasted six weeks, with many picnic sites unusable, forcing event permit holders to relocate to the mainland.

As an organized planner, you must treat May and June as a “high-risk” period. This doesn’t mean you can’t go, but it means you must do your due diligence and have a contingency plan. Before committing, check official sources. The City of Toronto’s website will post advisories, and Environment Canada tracks Lake Ontario water levels. A quick search of recent visitor photos on social media can also provide real-time visual confirmation of conditions on the ground. Most importantly, have a mainland backup location ready, like Cherry Beach or Ashbridges Bay Park, just in case.
Avoid booking non-refundable tickets or making solid plans during this two-month window without first verifying that your intended area is dry and open. A few minutes of research can save you from arriving at the ferry terminal only to discover your destination is underwater.
When to Head to the Docks to Beat the 30-Minute Ferry Lineup?
Timing your arrival and departure is the art of outsmarting the crowd. For the trip to the islands on a summer weekend, the rule is simple: go early or go late. The largest surge of people hits the Jack Layton Ferry Terminal between 10:00 AM and 1:00 PM. Arriving before 9:30 AM often means you’ll walk on with minimal waiting. Alternatively, arriving after 2:00 PM will also see thinner crowds, though this cuts into your valuable BBQ time.
However, the more critical and anxiety-inducing calculation is the return trip. The “last ferry” looms large in every island-goer’s mind, creating a predictable rush. Most groups start packing up around sunset, leading to a massive buildup at the island-side ferry docks between 7:00 PM and 9:00 PM. Waiting until the second-to-last scheduled ferry to head to the dock is a rookie mistake that can easily result in a 30-60 minute wait in a packed, tired, and cranky crowd.
The professional planner’s approach is to create a buffer. Your “exit strategy” should begin long before you pack the last burger. The key is to start moving towards the docks at least one full ferry cycle before you actually want to leave. If ferries are running every 30 minutes, you should be packed up and walking to the dock 30-45 minutes *before* your target ferry’s departure time. This buffer absorbs the time it takes to walk from your picnic spot and, more importantly, secures your place in the queue ahead of the main rush.
Think of it as a reverse commute. You don’t leave your house five minutes before you need to be at work; you build in time for traffic. The ferry line is your traffic. On a beautiful summer evening, being at the front of the line for a ferry you can comfortably board is a small luxury that makes the entire day feel like a success. Pushing it to the last minute guarantees a stressful end to an otherwise perfect day.
Why the Jack Layton Ferry Terminal Is a Bottleneck on Summer Weekends?
Understanding why the ferry terminal becomes a “logistical choke point” is key to defeating it. The long lines aren’t random; they are a predictable result of a system operating beyond its capacity. Even if you’ve pre-purchased your tickets online—a common but incomplete piece of advice—you are still subject to the physical queue. The core issue lies in the terminal’s design: a single-file ticketing and security screening area that all passengers must pass through.
On a peak summer weekend, the terminal’s fixed infrastructure simply cannot process the surge of people efficiently. An analysis of terminal operations shows that once the crowd exceeds a certain threshold, wait times grow exponentially, often reaching 30 to 60 minutes during peak hours. This is the bottleneck. The line snakes back from the gates, often far past the covered waiting area and out into the open sun. For a group managing a heavy wagon and potentially young children, this standing wait can drain energy and morale before the day has even begun.
This is where the water taxi becomes a powerful strategic tool. While the ferry is the mass transit system, water taxis are the express bypass lane. They operate from multiple smaller docks along Queens Quay, completely circumventing the Jack Layton Ferry Terminal and its associated queue. The primary water taxi docks are located at:
- Harbourfront Centre (235 Queens Quay West)
- HTO Park West (near Spadina)
- York Street Slip (207 Queens Quay West)
- Yonge Street Slip (5 Queens Quay West)
Opting for a water taxi on the trip *to* the island on a busy morning is a calculated decision to trade a higher cost for a guaranteed faster and less stressful start. You are buying your way out of the bottleneck. This is especially valuable when your time on the island is limited and you want to maximize every minute of your day.
How to Rent a Bike on the Waterfront Trail Without Leaving a Massive Deposit?
Once on the island, mobility becomes the next logistical challenge. The islands are larger than they appear, and a bike can turn a long walk into a pleasant ride. Historically, the on-island bike rental was the only option, but it comes with a significant drawback: a hefty security deposit, often $200-$300 per bike, which can be a major cash flow issue for a group. The arrival of Bike Share Toronto docks on the islands has changed the game, but it introduces its own set of rules and potential pitfalls.
The best option now depends on your planned usage. As the event planner for your group, you must weigh cost against convenience. A mainland rental shop offers flexibility, but requires you to transport the bike on the ferry. The on-island rental is convenient but expensive and requires a large deposit. Bike Share Toronto offers the lowest financial barrier to entry, but is best for shorter-term use.
This comparison table, based on data from local guides and rental services, clarifies the decision. The break-even point is the key metric: for trips under four hours, Bike Share is typically more economical. For a full-day, dedicated cycling excursion, a traditional rental may be better value despite the deposit.
| Option | Cost Structure | Deposit Required | Availability | Break-even Point |
|---|---|---|---|---|
| Bike Share Toronto | $7 day pass + overage fees | $0 (credit card hold only) | New 2025 docks at all ferry terminals | Best for under 4 hours |
| Island Bike Rental | $30-40 for half day | $200-300 security deposit | Centre Island only, 11am-5pm | Better for full day use |
| Mainland Rental + Ferry | $25-35/day | Varies by shop | Multiple locations | Most flexible option |
A critical new consideration for Bike Share users is the “dock-blocking problem.” With new docks at Ward’s Island, Centre Island, Gibraltar Point, and Hanlan’s Point, the system is more accessible than ever. However, on busy days, these docks can fill up completely. This prevents riders from ending their rental, which can lead to unexpected overage charges. The pro tip is to check the Bike Share app for dock availability before you head to a return station. If the dock is full, you may need to wait for a spot to open up or ride to a different station, so factor this potential delay into your timing.
Key Takeaways
- Plan Like a Pro: Success hinges on treating your BBQ not as a casual outing, but as a planned operation with clear entry and exit strategies.
- Master Your Gear: Your wagon is your most critical piece of equipment. A stable, well-packed wagon neutralizes the ferry ramp, one of the biggest physical hurdles.
- Know Your Environment: The islands are not a monolith. Match your destination (Centre, Hanlan’s, Ward’s) to your group’s specific needs for space, quiet, and amenities to avoid comfort-related friction.
Water Taxi vs Ferry: Is Saving 20 Minutes Worth the Extra $10 Cost?
The final and often most crucial decision of your island mission is the choice between the ferry and a water taxi for your return trip. This isn’t just about money; it’s about time, stress, and peace of mind. As the sun sets and the pressure of the last public ferry mounts, the value proposition of the water taxi changes dramatically. What seems like a luxury on the way there can become a necessity on the way back.
Let’s break down the raw numbers. A one-way trip on a water taxi is more expensive than the ferry’s round-trip fare. Typically, water taxis charge around $12.50-$13 per person one-way, compared to the ferry’s $9.11 round-trip cost. The travel time is also faster: 5-10 minutes on a water taxi versus 15-20 minutes on the ferry. On paper, you’re paying a premium to save a little time. But in practice, you are buying insurance against the queue.
The real value of the water taxi emerges in specific, high-stress scenarios. If you are running late and the last public ferry is approaching, the extra cost is negligible compared to the alternative of being stranded. If your group includes exhausted young children who cannot handle another 30-60 minute wait in line, the water taxi is a sanity-saver. A good rule of thumb: if the ferry line on the island side has grown so long that you can’t see the dock, the water taxi is worth it. It’s also your only option if you miss the last ferry, though be prepared for a late-night premium that can exceed $25 per person.
Conversely, for a solo traveler with a flexible schedule or on a quiet weekday with no lines, the ferry remains the most economical and sensible choice. The decision should be a dynamic one, based on the real-time situation on the ground. A smart planner budgets for a potential water taxi return trip as a contingency, even if they plan to take the ferry. It’s the ultimate “get out of jail free” card for your island exit strategy.
To execute a flawless Toronto Islands BBQ, you must shift your mindset from a casual guest to a competent event planner. By anticipating choke points, mastering your gear with a robust wagon strategy, and having a clear exit plan, you transform a potentially stressful day into the seamless, enjoyable experience you envisioned. The key is not to leave things to chance, but to engineer success through preparation. Evaluate your transportation options, pack with purpose, and always, always keep an eye on the clock.