The secret to a successful Toronto backyard isn’t about avoiding maintenance, but about designing a resilient system from the ground up that thrives in our specific urban environment.
- Focus on using Ontario-native plants for superior climate adaptation and reduced water needs.
- Choose hardscaping materials and privacy solutions that can withstand Toronto’s demanding freeze-thaw cycles.
Recommendation: Begin any project by understanding local by-laws and your property’s specific grading to prevent costly future mistakes and ensure long-term success.
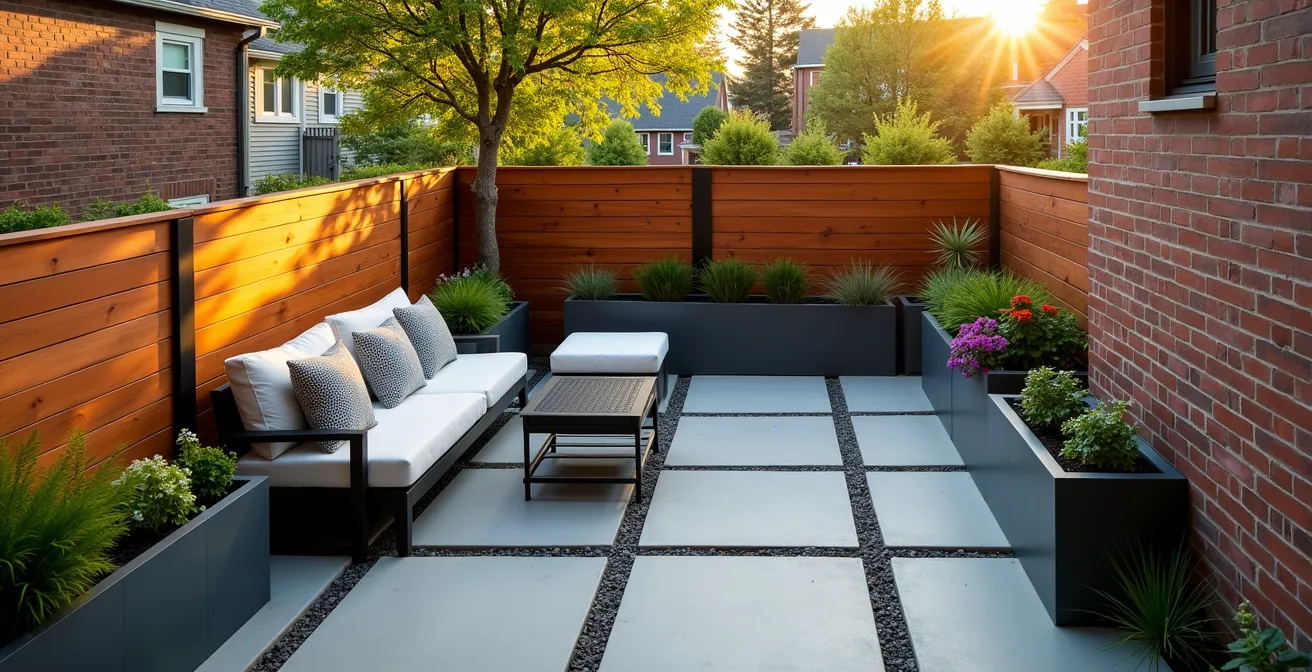
For many Toronto homeowners, the dream of a private green sanctuary clashes with the reality of a narrow, overlooked, and often challenging urban lot. The desire for an outdoor escape is strong, but the prospect of constant upkeep is daunting. The typical solutions often feel like a compromise: paving over paradise for a sterile, maintenance-free slab, or installing plastic turf that lacks the soul of a living garden. These approaches solve one problem while creating another, disconnecting us from the very nature we seek to embrace.
But what if the path to a truly low-maintenance yard wasn’t about eliminating nature, but about working smarter with it? What if the key wasn’t in generic, one-size-fits-all advice, but in a design philosophy rooted in ecological and structural foresight? A truly sustainable urban oasis is one designed to work *with* Toronto’s specific climate, its clay-heavy soil, and its municipal regulations, not against them. It’s about creating a resilient system that anticipates challenges like water runoff and winter damage, saving you time, money, and headaches down the line. This approach turns your backyard from a seasonal chore into a year-round asset.
This guide will walk you through the core principles of designing such a space, focusing first on creating that resilient backyard. We will explore how strategic plant and material choices can transform your narrow lot. Then, we’ll broaden our scope to uncover other critical, often-overlooked aspects of savvy Toronto homeownership, from geological risks to simple changes that significantly boost your property’s value. Think of it as a holistic manual for thriving in your Toronto home, inside and out.
Summary: How to Design a Low-Maintenance Backyard in a Narrow Urban Lot?
- Why Native Ontario Plants Reduce Your Water Bill and Maintenance Time?
- How to Use Cedars or Trellises to Block the Neighbour’s View in a Row House?
- Wood Deck or Stone Patio: Which Lasts Longer in Toronto Winters?
- The Grading Mistake That Floods Your Basement After a Rainstorm
- When to Install a Living Wall to Maximize Greenery in a Concrete Yard?
- Why Standing on the Edge of the Bluffs Is a Deadly Risk?
- The Septic Inspection Mistake That Can Cost New Cottage Owners $25,000
- Which White Paint Color Increases Resale Value for Toronto Condos?
Why Native Ontario Plants Reduce Your Water Bill and Maintenance Time?
The foundation of a low-maintenance garden isn’t technology; it’s ecology. Instead of forcing exotic plants to survive in a foreign environment, the smartest strategy is to embrace the flora that has evolved over millennia to thrive in Southern Ontario’s specific conditions. Native plants are genetically programmed to handle our clay-heavy soil, our humid summers, and our cold winters. Once established, their deep root systems make them exceptionally drought-tolerant, significantly reducing your reliance on the garden hose.
This natural adaptation translates directly into savings of both time and money. You’ll spend less time wrestling with fertilizers, pesticides, and supplemental watering because these plants are already suited to the local ecosystem. According to the City of Toronto, choosing the right plants is a key component of water conservation, as native plants need less maintenance and require less water after their initial establishment period. This creates a self-sustaining garden that also provides vital food and shelter for local pollinators like bees and butterflies, turning your small yard into a valuable ecological hub.
For a Toronto backyard, especially one with challenging clay soil, consider these resilient native perennials:
- Black-eyed Susan (Rudbeckia): A cheerful, sun-loving flower that thrives in clay and is drought-tolerant once established.
- Wild Geranium: An excellent choice for the shadier parts of a narrow yard, requiring minimal watering.
- Little Bluestem Grass: This ornamental grass provides beautiful texture and colour that lasts into the winter, and it’s perfectly adapted to local soil.
- Red Osier Dogwood: A shrub whose bright red stems provide striking winter interest and is resistant to common local pests.
- Native Goldenrod: A crucial late-season bloomer that supports a wide range of local pollinators before winter.
How to Use Cedars or Trellises to Block the Neighbour’s View in a Row House?
In the tight quarters of a Toronto row house or semi-detached home, privacy is a precious commodity. Creating a sense of seclusion without building a fortress is a delicate balancing act. The two most effective strategies for vertical screening are the ‘living fence’ of cedars and the versatile hard structure of a trellis. The choice between them depends on your budget, timeline, and long-term maintenance preferences.
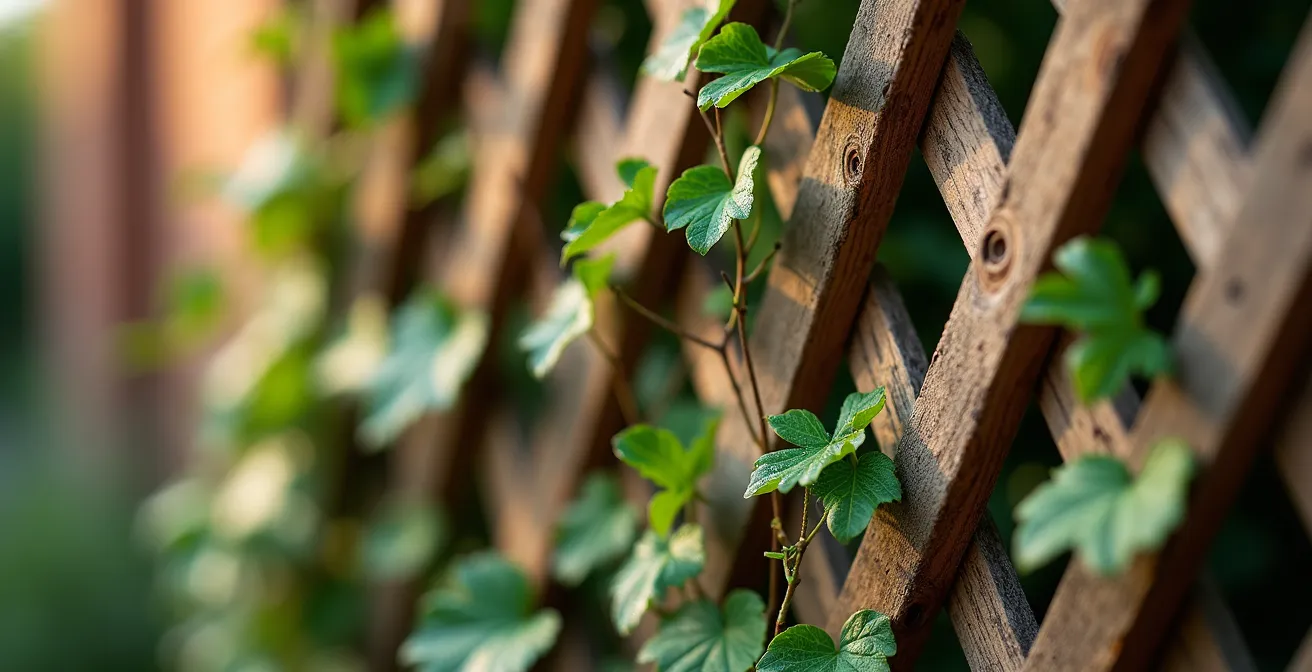
A row of Emerald Cedars (Thuja occidentalis) is a classic solution, offering a lush, green wall that provides year-round coverage. However, they require a few years to grow to a height that offers real privacy and need regular pruning to maintain their shape. A trellis, on the other hand, offers immediate structural privacy that can be enhanced with fast-growing climbing vines like Boston Ivy or clematis. It’s important to note that any privacy screen, living or built, is subject to municipal regulations. For instance, Toronto’s fence bylaw generally permits a maximum height of 2.0 metres for structures in the rear yard, a critical constraint to factor into your design.
To make an informed decision, a direct comparison is often the most helpful tool. The following table breaks down the key differences between these two popular privacy solutions for the Toronto context.
| Feature | Emerald Cedars | Wood/Metal Trellis |
|---|---|---|
| Initial Cost | $30-50 per cedar | $200-400 per panel |
| Maintenance | Annual pruning, watering | Annual staining/painting |
| Height Potential | Up to 15 feet | Limited to 6.5 feet bylaw |
| Privacy Timeline | 2-3 years for full coverage | Immediate with vines |
| Foundation Impact | Root system concerns | Minimal impact |
Wood Deck or Stone Patio: Which Lasts Longer in Toronto Winters?
When selecting the primary surface for your urban oasis, the decision often comes down to the warmth of a wood deck versus the permanence of a stone patio. In Toronto, this choice is heavily influenced by one major factor: the demanding freeze-thaw cycle. Our winters don’t just get cold; they fluctuate wildly above and below freezing, causing water in the ground to expand and contract. This powerful force can heave, crack, and destroy improperly installed surfaces.
A well-built pressure-treated wood or composite deck can last 15-25 years, but requires regular staining and sealing to prevent rot and splintering. Composite decking offers a lower-maintenance alternative but comes at a higher initial cost. A stone patio, built on a properly excavated and compacted granular base, is the undisputed champion of longevity. Materials like locally sourced Ontario limestone or high-quality permeable pavers can last for 30 years or more with minimal upkeep, making them a more sustainable long-term investment. They are impervious to rot and pests, and their solid footing makes them exceptionally stable against frost heave.
Case Study: The Forman Ave Hybrid Solution
A project by KT Landscape Design in Toronto’s Forman Ave area provides an elegant solution for narrow urban lots. Instead of choosing one material, the design features a hybrid approach: a small, raised composite deck area perfect for seating, which seamlessly transitions to a permeable paver patio. This optimizes the space for different uses while combining the modern aesthetic of decking with the superior durability of stone, a design strategy that is increasingly popular in the Toronto market.
Ultimately, durability in Toronto is less about the material itself and more about the quality of the installation. A poorly built patio will fail faster than a well-built deck. Before starting, it is crucial to audit the specific needs of your project.
Action Plan: Checklist for Climate Durability in Toronto
- Assess Freeze-Thaw Impact: Confirm your contractor will use a deep, compacted gravel base (typically 12 inches or more) to mitigate frost heave.
- Source Local Materials: Prioritize Ontario limestone like Eramosa or Wiarton stone, or pavers rated for severe weather, as they are adapted to our climate.
- Plan for Salt Exposure: If the area is near a walkway, choose materials specifically resistant to damage from de-icing salts.
- Engineer for Drainage: Ensure the design includes a clear slope away from your home’s foundation to prevent water pooling and infiltration.
- Budget for Longevity: Compare the initial cost of stone versus the lifecycle cost of wood (including regular maintenance) to make a sound financial decision.
The Grading Mistake That Floods Your Basement After a Rainstorm
Of all the elements in backyard design, none is more critical—or more dangerously overlooked—than proper lot grading. This refers to the slope of the land around your home’s foundation. The single most devastating mistake is creating ‘negative grading,’ where the ground slopes *towards* your house instead of away from it. During a heavy Toronto downpour, this effectively turns your foundation into a dam, channeling gallons of water directly against your basement walls, where it will inevitably find a way in through cracks, window wells, or porous concrete.
The problem is rampant in many of Toronto’s older neighbourhoods, where decades of soil settlement have created this reverse slope. The consequences are not just a damp nuisance; they can lead to catastrophic flooding, mould growth, and structural damage. The scale of this issue is so significant that $2.1 billion has been allocated by Toronto Water for its Basement Flooding Protection Program over the next decade. Correct grading, which requires a gentle slope of at least two to three percent away from the foundation for a distance of several feet, is your first and most important line of defence.
Before you lay a single paver or plant a single flower, you must assess and, if necessary, correct your lot’s grade. This may involve bringing in clean fill soil to build up the area around your foundation or installing more complex drainage solutions like French drains or swales. It’s not the most glamorous part of landscaping, but it is the one that protects the single biggest investment you own: your home. Overlooking this step is a gamble no homeowner can afford to take.
When to Install a Living Wall to Maximize Greenery in a Concrete Yard?
What happens when horizontal space is not just limited, but virtually non-existent? For the narrowest of Toronto lots, laneway house courtyards, or backyards dominated by existing patios, the answer is to build upward. A living wall, or vertical garden, is the ultimate expression of this strategy. It’s the ideal solution when you want to introduce a lush, dramatic expanse of green without sacrificing a single square foot of precious floor space.
A living wall is most appropriate when two conditions are met: you have a structurally sound vertical surface that receives adequate light, and you are prepared for the commitment of a more complex irrigation system. These systems, which can range from simple drip lines to sophisticated automated hydroponics, are essential to keep the plants healthy. While the visual impact is unparalleled, it’s crucial to understand the regulatory framework, especially if the wall is on a property line. As the design experts at Sandbox Land Studio note, these features are often treated like other structures.
Living walls or structures to support climbing vines can be constructed, but they’re subject to the same height rules as fences if located along property line.
– Sandbox Land Studio, Rowhouse and Small Space Landscape Design Guide
This means your vertical garden project must respect the same height and setback by-laws as a fence or trellis. For a lower-tech approach, you can achieve a similar effect by using a series of raised planters, wall-mounted containers, or trellises to support climbing plants. Combining these with tall, narrow trees like columnar maples or hornbeams draws the eye upward, creating an illusion of space and maximizing the green footprint in the tightest of urban settings.
Key Takeaways
- Smart backyard design in Toronto is about working with the local climate and soil, not fighting against them.
- Prioritizing Ontario-native plants is a financial, ecological, and low-maintenance victory for any homeowner.
- Proper lot grading is the single most critical, non-negotiable element for protecting your home’s foundation from water damage.
Why Standing on the Edge of the Bluffs Is a Deadly Risk?
Beyond the boundaries of your own property, understanding Toronto’s unique geological features is a crucial aspect of responsible citizenship and personal safety. The Scarborough Bluffs are one of the city’s most beautiful natural landmarks, but they are also one of its most dangerous. The “deadly risk” is not an exaggeration; it’s a geological reality. The primary danger comes from the inherent instability of the Bluffs’ structure.
The cliffs are composed of layers of sand, silt, and clay—materials left behind by a glacial lake thousands of years ago. This composition is highly susceptible to erosion from rain, wind, and the relentless action of Lake Ontario’s waves at the base. This erosion creates a phenomenon known as undercutting, where the base of the cliff is worn away, leaving the upper sections unsupported. What looks like solid ground from the top is often a massive, unstable overhang with nothing but air beneath it.
The weight of a single person can be enough to trigger a catastrophic collapse. There are no warning signs; the ground simply gives way. Despite numerous signs and fences, people venture to the edge for photos or a better view every year, risking a fall of over 90 metres (300 feet). Respecting the barriers is not just about following rules; it’s about understanding that the very ground you’re standing on could be a fragile illusion, ready to disappear into the lake below.
The Septic Inspection Mistake That Can Cost New Cottage Owners $25,000
For many Torontonians, the dream of homeownership extends to a cottage—a peaceful retreat from city life. However, this dream can quickly turn into a financial nightmare due to a common but costly oversight: the septic inspection. When purchasing a rural property, many buyers make the mistake of accepting a basic, cursory inspection of the septic system, which is the private, on-site wastewater treatment facility.
The critical mistake is relying on a simple “visual inspection” or a report from the seller that only confirms the tank was recently pumped. This tells you almost nothing about the health of the most crucial and expensive part of the system: the leaching bed (or drain field). This is the network of underground pipes that filters and disperses treated wastewater. If the leaching bed fails, the entire system fails. A proper inspection, often called a “load test” or “hydraulic load test,” involves introducing a large volume of water into the system to see how it performs under stress, or even using a camera to inspect the pipes for blockage or collapse.
Why is the mistake so costly? Replacing a failed septic system is a massive undertaking. The $25,000 figure is not an exaggeration; costs can often be higher. It involves heavy machinery to excavate the old system, designing a new one that meets strict modern environmental codes, and the extensive landscaping required to restore the property afterward. For a new cottage owner, this unexpected expense can be devastating. Insisting on a comprehensive, invasive septic inspection before closing the deal is the single most important piece of due diligence you can perform.
Which White Paint Color Increases Resale Value for Toronto Condos?
Finally, maximizing your property’s value extends from the soil under your yard to the paint on your walls. In the competitive Toronto condo market, small details can have a significant impact on resale value and how quickly a property sells. While personal taste is subjective, the strategic choice of paint color is an objective tool. When it comes to creating broad appeal, one colour consistently outperforms all others: a warm, neutral white.
But not all whites are created equal. The goal is to avoid whites that are too stark and clinical, which can feel cold and uninviting, or whites that are too creamy, which can look dated or dirty. The perfect resale white for a Toronto condo is one that acts as a blank canvas, making the space feel larger, brighter, and cleaner. It allows potential buyers to project their own lives and furniture into the space without being distracted by someone else’s colour choices. This psychological effect is powerful; it creates a sense of possibility and depersonalized potential.
While trends change, certain shades have become industry standards among Toronto real estate agents and designers for their universal appeal. Colours like Benjamin Moore’s “Chantilly Lace” (OC-65) or “Cloud White” (OC-130) are go-to choices. They have just enough warmth to feel inviting without having strong yellow or blue undertones. Painting your condo in one of these proven neutral whites is one of the highest-return, lowest-cost investments you can make before putting your property on the market. It neutralizes the space and presents it in its best possible light, appealing to the widest possible pool of buyers.
Applying these principles of foresight—from your native plant choices to your interior paint—is the first step toward creating a truly intelligent, resilient, and valuable Toronto home. Assess your own space today to identify where smart design can make the biggest impact on your quality of life and your investment.
Frequently Asked Questions About Toronto Backyard & Home Issues
What causes basement flooding from poor grading?
Overland flow during heavy rainfall can seep into a property due to poor lot grading and/or drainage. This allows water to flow toward rather than away from the foundation walls, eventually finding its way into the basement through cracks or window wells.
What’s the ‘reverse slope’ issue common in older Toronto homes?
Many properties in established Toronto areas like Parkdale or Riverdale have settled over many decades. This settlement can cause the ground immediately around the house to sink, creating a ‘negative’ or ‘reverse’ slope where water flows back toward the house instead of away from it to the street or yard.
How quickly does Toronto respond to flooding issues?
When you report an issue like a flooded basement or sewer backup by calling 311, the customer service response time is normally four hours. However, this can vary significantly and may be longer during widespread, heavy rainfall events when call volumes are high.