In summary:
- Successful Victorian renovation in Toronto prioritizes building science—especially moisture management and structural integrity—over fleeting aesthetic trends.
- Understanding and respecting Toronto’s Heritage Preservation rules, particularly for facades and windows, is non-negotiable to avoid costly project rejections.
- Focus on “breathing” materials for insulation to prevent moisture damage to original double-wythe brick walls.
- Strategic investments like basement underpinning and creating legal secondary suites offer significant ROI, offsetting renovation costs.
- A phased renovation plan is critical for maintaining livability and managing budgets effectively during the project.
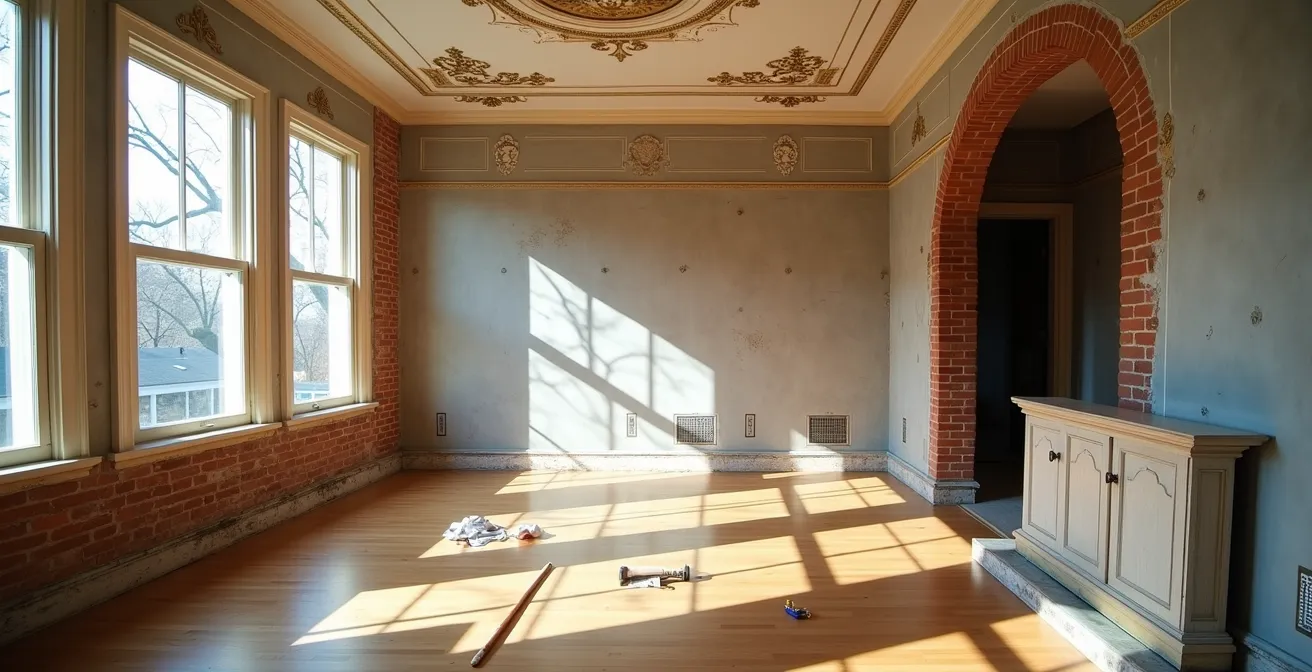
Owning a Victorian home in a historic Toronto neighbourhood like Cabbagetown or The Annex is to be the custodian of a piece of the city’s soul. The dream is to infuse modern comfort into its storied walls, creating a space that is both functional for today and respectful of its past. However, this dream can quickly turn into a nightmare of spiralling costs, structural damage, and heritage permit disputes. The common advice to simply “mix old with new” or “create an open-concept layout” is not just superficial; for a Victorian structure, it can be destructive.
These century-old homes are not inert boxes; they are complex, breathing systems. Their double-wythe brick walls, lime mortar, and original wood windows were designed to manage moisture in a way that modern construction methods often ignore. Applying contemporary solutions without a deep understanding of heritage building science is the single greatest threat to your home’s integrity and value. The key isn’t to fight the building’s nature but to work with it.
This guide moves beyond aesthetics to provide a technical, architectural perspective on renovation. We will not focus on paint colours or furniture styles. Instead, we will address the foundational questions that determine a project’s success or failure. The true art of modernizing a Victorian lies in a disciplined approach that treats the house as a patient, diagnosing its needs and prescribing interventions that enhance its health, longevity, and character. This is how you honour its history while securing its future.
This article provides a structured approach to your renovation, addressing the most critical technical and regulatory challenges you will face. The following sections will guide you through the crucial decisions, from heritage committee approvals to the most profitable investments for your property.
Summary: A Technical Guide to Modernizing Your Toronto Victorian
- Why your facade project might be rejected by the heritage committee?
- Insulation of old walls: how to avoid destructive moisture problems?
- The trap of asbestos and lead: what you must test before opening walls?
- Original windows or modern replicas: which choice for resale value?
- In what order to renovate a Victorian to live in it during the work?
- Why basement lowering (underpinning) is the most profitable investment in Toronto?
- Wallpaper or paint: what coating to choose to hide the flaws of an old wall?
- How to transform your basement into a legal rental apartment in Toronto?
Why your facade project might be rejected by the heritage committee?
For any property within a Heritage Conservation District (HCD) like Cabbagetown, your home’s facade is not yours alone—it’s part of the city’s collective history. The Toronto Heritage Preservation Services office acts as its guardian. Any proposed alteration, from window replacement to brick painting, requires a Heritage Permit, and a rejection can halt your project for months. The primary reason for rejection is a proposal’s failure to respect the “heritage attributes” of the property and district. This often means using inappropriate modern materials (like vinyl windows or cement-based mortar for repointing) or altering the original massing and architectural details.
The city’s review process is meticulous. They will scrutinize your submitted drawings, material specifications, and the overall impact on the historic streetscape. Simply stating you want to “modernize” is a red flag. Your application must demonstrate a conservation-first approach. According to Toronto’s official guidelines, there is a 90-day statutory time limit for heritage permit decisions, and a poorly prepared application can easily lead to a denial, forcing you back to the drawing board and causing significant delays.
To succeed, you must think like a conservationist. Your proposal should justify every change in the context of preservation. For example, if you propose replacing a feature, you must first prove it is beyond repair. If you are introducing a new element, it must be subordinate to, and compatible with, the historic character. Engaging a heritage consultant or an architect with proven experience in Toronto’s HCDs is not a luxury; it’s a strategic necessity to navigate the complex approval process successfully.
Insulation of old walls: how to avoid destructive moisture problems?
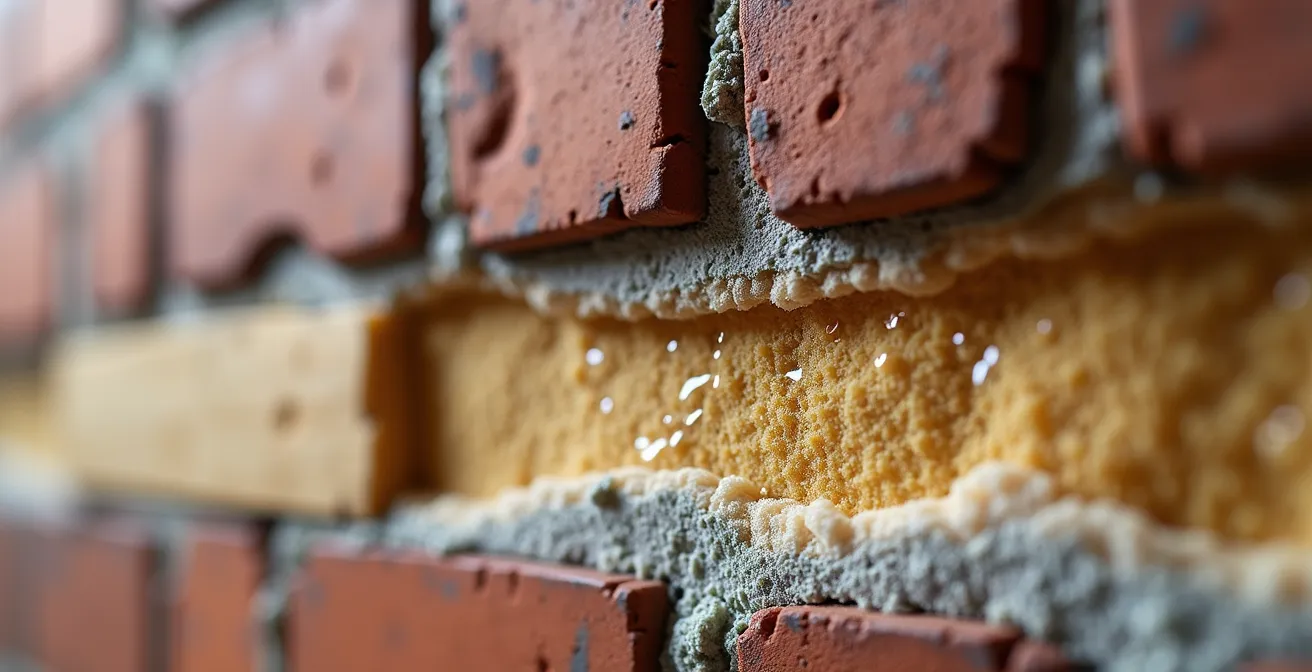
The single most dangerous mistake in a Victorian renovation is improper insulation. These homes were built with solid, double-wythe brick walls designed to be “breathable”—allowing moisture to enter and exit naturally. Modern, non-breathable insulation like closed-cell spray foam or PIR boards acts like a plastic bag, trapping moisture within the wall cavity. This trapped moisture can freeze and thaw, leading to brick spalling (disintegration), mortar decay, and the growth of destructive mould inside your walls. It is a slow, silent killer of historic buildings.
A case study of a Toronto Victorian highlights this risk: a contractor installed non-breathable foam boards directly onto the brick, leading to severe condensation. The owner was forced to rip everything out and start over. The solution lies in using vapour-permeable and hygroscopic materials that work with the wall’s natural function. These materials, such as wood fibre boards or certain types of mineral wool, can absorb and release moisture, maintaining the health of the building envelope.
The diagram below illustrates the correct layering for a breathable wall assembly, ensuring moisture can escape to the outside rather than being trapped within the structure.
As you can see, the system is designed as a series of layers, each with a specific role in managing moisture and heat. It’s a technical approach that requires careful selection of compatible materials. The following table compares common insulation types and their suitability for historic brick homes.
| Material Type | Breathability | Moisture Management | Cost Range | Best Application |
|---|---|---|---|---|
| Wood Fibre Boards | Vapour permeable & hygroscopic | Absorbs and releases moisture naturally | Premium | Internal walls, especially Victorian solid walls |
| Mineral Wool | Vapour-permeable | Requires effective vapour control | Cost-effective | Between wall studs, needs ventilation |
| Closed-cell spray foam | Non-breathable | Traps moisture, causes spalling | Moderate | NOT recommended for Victorian brick |
| PIR/XPS boards | Non-breathable | Can trap moisture without control | Moderate | Concrete floors only, avoid on walls |
The trap of asbestos and lead: what you must test before opening walls?
Behind the lath and plaster of many Toronto Victorians lie hidden hazards: asbestos and lead-based paint. These materials were common and legal for much of the 20th century. Asbestos can be found in a surprising number of places, including old pipe insulation, vinyl floor tiles, drywall joint compound, and vermiculite attic insulation. Lead is the primary component of most paint layers applied before the 1970s. These materials are generally stable and harmless when left undisturbed. The danger arises during renovation, when demolition and sanding release toxic fibres and dust into the air, posing a severe health risk to your family and workers.
Before any demolition begins, professional testing is not optional; it is a legal and ethical requirement. A designated substance survey (DSS) will identify the location and type of any hazardous materials. Do not attempt to test or remove these materials yourself. Abatement must be performed by a licensed and insured contractor who will follow strict containment and disposal protocols. The costs can be significant, with professional remediation potentially ranging from $1,000 to $25,000 for remediation depending on the extent of the contamination. Factoring this into your initial budget is critical to avoid derailing your project financially.
The cost of asbestos removal varies significantly based on the material type and its location, as it dictates the complexity of the containment and removal process. The following table provides a general overview of what to expect for budgeting purposes in the Toronto area.
| Material Type | Cost per sq. ft. | Common Locations | Difficulty Level |
|---|---|---|---|
| Drywall/Ceilings | $10-$15 (drywall) $20-$25 (plaster) |
Throughout home | Moderate |
| Insulation | $15-$25 | Attics, walls | High (accessibility) |
| Tiles/Flooring | $25 (on concrete) $35 (with subfloor) |
Basements, kitchens | Moderate to High |
| Ducts/Pipes | $35-$45 per linear ft | Basements, utilities | High (concrete elbows) |
Original windows or modern replicas: which choice for resale value?
The windows are the “eyes” of a Victorian home, and your decision here has a profound impact on both its character and market value. The default in modern renovation is to rip out old “draughty” wood windows and replace them with standard vinyl replicas. From a heritage perspective, this is often a mistake. Original, old-growth wood windows, when properly restored, are a significant asset. They were made from dense, durable wood that is often superior to modern lumber. With professional restoration—including repairs, weatherstripping, and the addition of a high-quality exterior storm window—they can achieve thermal performance comparable to many new double-paned windows.
In premium heritage districts like The Annex, discerning buyers and appraisers recognize the value of preserved original features. A full set of restored original windows can be a major selling point, whereas a house full of generic vinyl replacements can be seen as a detraction from its historic authenticity. Furthermore, the City of Toronto actively encourages preservation through financial incentives. As the Cabbagetown Heritage Conservation District Committee notes, a key program can be a significant financial aid for homeowners:
The Toronto Heritage Grant Program provides grant funds of up to 50% of the estimated cost of eligible heritage conservation work. Owners of properties designated under Parts IV or V of the Ontario Heritage Act may qualify for up to $10,000 for residential house form buildings.
– Cabbagetown Heritage Conservation District Committee, Heritage Permit Process Guide
This grant can make the cost of professional restoration highly competitive with full replacement. The decision should not be made lightly; it requires a careful audit of the existing windows and a cost-benefit analysis that looks beyond the initial price tag to consider long-term value and heritage compliance.
Action Plan: Window Restoration vs. Replacement Audit
- Condition Assessment: Commission a heritage window specialist to evaluate each window’s wood condition, operational hardware, and glazing. Document rot, damage, and areas needing repair.
- Cost-Benefit Analysis: Obtain detailed quotes for both full restoration (including storm windows) and high-quality, heritage-appropriate replicas. Factor in potential savings from the Toronto Heritage Grant Program.
- Performance Comparison: Request U-value (thermal transmittance) data for both options. Compare the performance of a restored original with a new storm window against that of a proposed modern replica.
- Neighbourhood Context Review: Walk your street in Cabbagetown or The Annex. Observe the precedent set by other high-quality renovations. Note whether top-tier properties feature restored originals or replacements.
- Heritage Permit Strategy: Draft a preliminary plan. If restoration is viable, your heritage permit application is straightforward. If proposing replacement, prepare a strong justification proving the originals are beyond economic repair.
In what order to renovate a Victorian to live in it during the work?
Living through a major renovation is a marathon, not a sprint. A logical, phased approach is essential to manage budgets, minimize disruption, and protect your sanity. The correct sequence prioritizes the building’s structural and weather-proofing integrity first. Attempting interior finishes before the building is sound and dry is a recipe for rework and wasted money. A common mistake is starting with a “fun” project like the kitchen, only to have it damaged by a roof leak or dust from structural work later on.
The first step is always a thorough structural assessment by a licensed engineer. They will evaluate the foundation, load-bearing walls, and roof structure. This is especially critical in Victorians where past renovations may have compromised the original integrity. From there, the work should proceed from the outside in, and from the top down. Securing the building envelope—the roof, brickwork, and foundation—is Phase 1. This work is best done in the fairer weather of summer and fall.
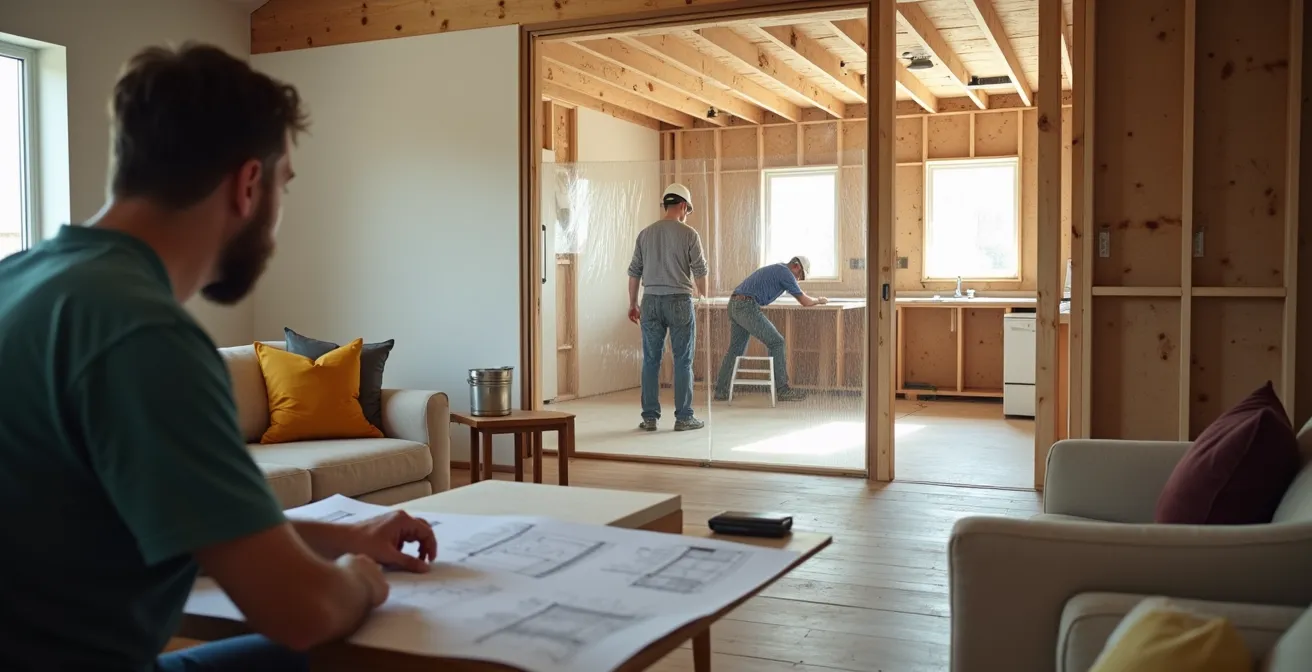
During the major disruptive phases, it is vital to establish a “safe zone.” This often involves creating a temporary living pod on one floor, complete with basic kitchen and bathroom facilities, and sealing it off from the construction zone with heavy-duty plastic sheeting and dust control measures. This allows for a semblance of normal life amidst the chaos, as depicted in the image below.
An expert-recommended sequence provides a clear roadmap. Following this order prevents redundant work and ensures that new finishes are installed in a stable, protected environment.
- Start with structural assessment by a certified engineer for foundation and load-bearing elements.
- Phase 1: Roof, foundation repairs, and exterior brickwork (summer/fall timing optimal).
- Phase 2: Windows restoration or replacement while weather permits.
- Phase 3: Major systems – HVAC, plumbing, electrical rough-in during winter months.
- Phase 4: Insulation and vapor barriers with proper breathability considerations.
- Phase 5: Interior finishes – drywall, flooring, trim work.
- Create a temporary living ‘pod’ on one floor with basic kitchen/bath facilities during work.
Why basement lowering (underpinning) is the most profitable investment in Toronto?
In a city where square footage is at a premium, the dark, damp, 6-foot-high basement of a typical Toronto Victorian represents a massive untapped asset. Underpinning—the process of excavating the basement floor and extending the foundation walls downwards to create a full-height living space—is arguably the single most profitable renovation you can undertake. You are not just finishing a basement; you are manufacturing new, high-value square footage within your existing footprint. This is a game-changer for both your lifestyle and your property’s resale value.
The return on investment (ROI) is staggering. While the cost is significant, the value added far exceeds the expense, especially in desirable neighbourhoods. Market analysis for Toronto shows that a 700 sq ft underpinned basement adds $399,000-$420,000 in value in premium areas like The Annex. This isn’t just a cosmetic upgrade; it’s a fundamental transformation of your home’s usable space, often adding an entire floor of living area for a new family room, bedrooms, or a home gym.
Beyond the immediate increase in your home’s equity, underpinning unlocks another powerful financial tool: the potential for a legal secondary suite. A well-designed basement apartment can generate significant rental income, helping to offset your mortgage and the cost of the renovation itself. As a case study on revenue potential shows, with average rents for one-bedroom units in Toronto between $1,800 and $2,200, the annual income of $24,000 or more can pay back the initial investment in as little as 4-6 years. This transforms a purely cost-based renovation into a self-liquidating, income-generating asset.
Wallpaper or paint: what coating to choose to hide the flaws of an old wall?
The plaster walls of a Victorian home are rarely perfectly smooth. After a century of settling and movement, they often display a “character” of hairline cracks, gentle undulations, and previous repairs. Your choice of wall covering must address two competing goals: hiding these imperfections and, crucially, maintaining the wall’s breathability. As discussed with insulation, trapping moisture is the enemy. Standard modern acrylic or latex paints create a non-breathable plastic-like film, which is unsuitable for old plaster that needs to regulate humidity.
For maximum authenticity and breathability, traditional lime wash or clay-based paints are ideal. They have a beautiful, matte finish that is period-appropriate and allows the walls to breathe freely. However, they offer minimal coverage for flaws and will telegraph the wall’s texture through the finish. If your goal is to conceal imperfections, high-quality, breathable wallpaper is an excellent choice. Designs from heritage brands like William Morris not only look authentic but are superb at hiding uneven surfaces. When installed with a traditional, clay-based adhesive, the system remains vapour-permeable.
A more intensive but effective option is to have the walls skim-coated with a new layer of plaster to create a perfectly smooth surface, which can then be painted with a breathable paint. This offers a flawless finish but is the most costly and labour-intensive approach. The choice depends on your budget, the condition of your walls, and your aesthetic goals. This table breaks down the options:
| Coating Type | Breathability | Flaw Coverage | Heritage Appropriateness | Typical Cost/sq ft |
|---|---|---|---|---|
| Traditional Lime Wash | Excellent – fully breathable | Minimal – shows texture | Perfect for period homes | $2-4 |
| Clay-based Paint | Very Good – moisture regulating | Moderate coverage | Good – natural finish | $3-5 |
| Quality Wallpaper (William Morris style) | Good with proper adhesive | Excellent – hides most flaws | Excellent – period appropriate | $5-15 |
| Modern Acrylic Paint | Poor – traps moisture | Good with proper prep | Not recommended for old plaster | $1-3 |
| Skim Coating + Paint | Depends on paint choice | Perfect smooth finish | Good if breathable paint used | $8-12 (with labor) |
Key Takeaways
- Prioritize Preservation: Always aim to repair original features before considering replacement. This maintains authenticity and is often encouraged by heritage grants.
- Think Like a System: Your Victorian home is an interconnected system. Changes to one part (e.g., insulation) will affect others (e.g., moisture levels in walls). A holistic, building-science-first approach is crucial.
- Budget for the Unseen: Renovations in old homes always uncover surprises. A 15-20% contingency fund for issues like asbestos abatement or unexpected structural repairs is not optional, it’s essential.
How to transform your basement into a legal rental apartment in Toronto?
Transforming your newly underpinned basement into a legal secondary suite is a smart financial strategy, but it requires strict adherence to the Ontario Building Code (OBC) and Toronto’s municipal bylaws. Simply creating a nice-looking space is not enough; it must meet rigorous standards for life safety, particularly regarding fire and egress. Failure to obtain the proper permits and inspections can result in fines, orders to undo the work, and significant liability issues.
Key requirements include minimum ceiling heights, fire separation between units, and proper egress. The OBC mandates specific finished ceiling heights (with allowances for ducts and beams), and at least one window large enough to escape through or a direct door to the outside. Fire-rated assemblies—using specific types of drywall and insulation—are required for walls and ceilings separating the suite from the main house. Furthermore, smoke and carbon monoxide alarms must be interconnected, so if one goes off, they all do.
Beyond fire safety, acoustic separation is vital for the comfort of both you and your tenant. This involves using resilient channels, double layers of drywall, and acoustic insulation in shared floors and walls to minimize noise transfer. A well-designed legal suite is an asset; a poorly executed one is a constant source of problems. The investment in creating a legal suite can see an ROI of 70-100% through the resulting rental income, making it a powerful component of your overall renovation strategy.
Navigating these regulations is complex. The checklist below outlines the primary considerations for your project. A building permit is mandatory.
- Ensure minimum finished ceiling height meets OBC targets (with allowances for beams/ducts).
- Install at least one egress window or door meeting clear-open size requirements.
- Create fire-rated assemblies between units (30-45-60 min depending on layout).
- Install interconnected smoke & CO alarms in both units.
- Add acoustic separation: clips + hat channel, 5/8″ drywall, mineral wool in shared ceilings/walls.
- Apply for a Building Permit for new suites or substantial alterations.
- Address moisture with interior/exterior waterproofing and proper ventilation (HRV/ERV).
A successful Victorian renovation is a testament to careful planning and a deep respect for the building’s inherent character. By following these technical principles, you move beyond simple decoration and become a true steward of your home’s history. To put these concepts into practice, the next logical step is to engage professionals who specialize in Toronto’s unique heritage housing stock.